
Simple to follow instructions to help you navigate the platform
This user guide has been created to help Global Edge customers step by step as they research, configure and provision
their network. Click on the tabs below to navigate the user guide.
This user guide will demonstrate how to register with Global Edge and create your own network organisation.
Step 1: Click on Global Edge registration ULR link: https://globaledge.activeport.cloud/#/ge-register

Step 2: A new page appears after you have registered.

You will receive a Global Edge welcome email. Click the “Account Login” to proceed.

Step 3: Enter the new password. Your password must be at least 15 characters long. A combination of uppercase letters, lowercase letters, numbers, and symbols. Click “Reset Password” when the password strength is full green.

Step 4: You will receive a password reset confirmation. Click on “sign in” link.

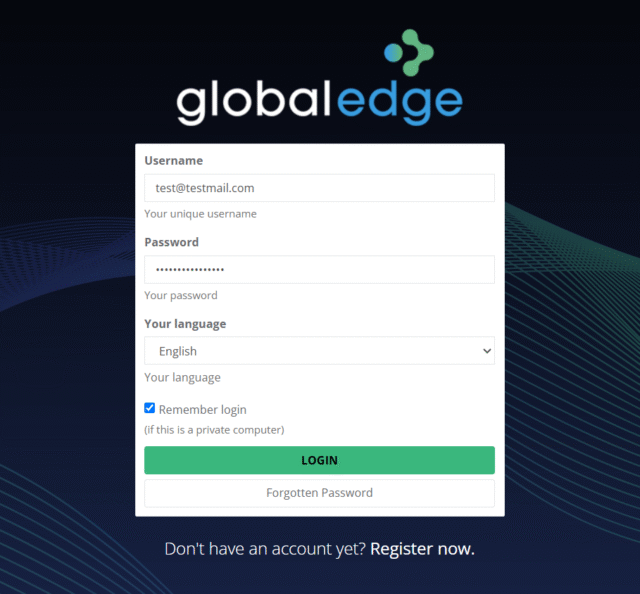
Step 5: Please login with your username and password. Click “Login” button.
Step 6: You will login to Global Edge home page. This allows you to create new Fibre Access or SDWAN services for a new customer or location.

This user guide will demonstrate how to create a Fibre Access service.
STEP 1: On the Service Activation page, under the Fibre Access tile, please click on Create Access.
Please note: Please ensure you are at the ALL-tenant level, to see the Service Activation page.
In this example below we have used Company Name “activeporttest”

If you already have existing NTUs and tenants, you will see the Options button instead.

STEP 2: Enter the site address, then click on the Qualify button.

STEP 3: If the site address is qualified, the status is On Net, please click on Next.

STEP 4: Please add the floor level and click Next.

STEP 5: Please provide a site Name, and NTU Name.

STEP 6: Please select the Handoff Type, either NTU Based or Port Based.

Please note: for the NTU Based option we will supply an NTU unit. The Port Based (Wires Only) connects directly to your existing NTU unit.
STEP 7: Please select your preferred term length and click on Next.

STEP 8: Now on the summary page, please double check all the information is correct before clicking on Submit Order.
STEP 9: Now the system will automatically create the new tenancy. Refresh the portal on the tenancy Network Tiles View page.

STEP 10: Please check your email for a Service Order confirmation.
STEP 11: Please reply to this confirmation email with the extra details such as: Site Contact and Building Contact as soon as possible. We will then coordinate with the FibreConX delivery team to process the order.